Thursday, May 26, 2011

Shiseido Maquillage Rouge Enamel Glamour - RD 733


A while ago I have seen Fuzkittie loaded tons of Maquillage Rouge Enamel Glamour on her facebook page, then I saw Jie Jie posted in her blog that she has hauled a few of these lippies and that sparked my interests in getting my hands on this product.


Other than RD 733 review in this post, I have also acquired the PK 744 in my mini haul from Hong Kong.


I am interested in how this product works. First step, you have to use the liquid lip color with its applicator on one end of the lippie, and this product is very similar with a lip stain:


Be sure to use lip balm prior to applying this part of the lippies because the formula quite drying to the lips. Make sure the formula dries throughly before applying the next step, the lip gloss, or else you will end up with a gluey yucky mess on your lips! (And so yucky that you can't wipe it away with tissue paper, only cleansing oil can remove the formula!)

Next step, use the applicator on the other side to apply lip gloss to seal in the moisture, and gloss is quite pretty with very fine shimmer flecks. I really like it^^


And according to the instructions, you can reapply this lip gloss as many times as you want to lock in moisture. I actually like this lip gloss a lot, because it's shimmery and non-sticky at all! However, it seems like this lip gloss will run out much sooner than the liquid lip color. Can I actually use another lip gloss with a similar texture, say, the Lancome Juicy Tubes, I wonder?

Swatches on the back of my hand, from left to right, lip gloss alone, lip color+lip gloss, and lip color alone:


I think from the picture, you can see the lip color alone is quite drying right?

Now testing of the lip product on my lips:

Under Daylight
With Flash
Under Indoor Lighting

The color of RD 733 is not really as "red" as name RD suggested. In fact it's more like a rosy, beige tone that works really well with my NC-30 skintone. Compared to pinker hues or oranger hues, this color is quite flattering for me :)

Long lasting? Hell yeah! It stays on my lips all day and all I need is to reapply the lip gloss throughout the day (hence I question if I can use Lancome Juicy Tubes in lieu of this when it runs out...) I have to use make up cleansing oil to remove this formula throughly. 


However, I have a slight issue with this lippie. First it's the time needed to wait till the lip color formula to dry up completely prior to applying the lip gloss.  I am not sure how long I will need to wait, whether it's one minute or two minutes?? And when waiting this formula to dry, I kind of have to keep my mouth wide open (like a fish!) because closing my lips will cause the formula to stick together... and this is the tiny annoying part, maybe for a minute or so?


And the next issue I have is this lip product tends to conglomerate into tiny lumps later in the day, and I noticed the problem maybe because of moisture. For example, the tiny lumps occur around the inner lips (where it's moister because it's closer to your oral cavity) or after you have a cup of water. I checked back at Fuz's facebook post, some tiny lumps actually show up in her inner lips with the different lip colors too! Anyone has the same problem?


Fuz using RD 252

Fuz using OR 212

See what I meant by the tiny lumps appearing in the inner lips area? I guess it's not terribly a big issue given how long lasting this lippie is :)

Wednesday, May 25, 2011

Mask Haul!! My Beauty Diary limited edition Hello Kitty strawberry milk tea masks!


Woot, I am always happy to see packages at my doorstep! Well, who doesn't?

My supply of "My Beauty Diary" masks have been diminishing so I figure out it's time to get some more so I will be ready for the up coming summer months!


Along with the masks, I got a pack of oil blotting paper (to blot off excess oil after applying sunscreen during make up!), beautymate eye masks, a hair turban by Kai, 2 brushes by Mizuho (which will be reviewed later...)

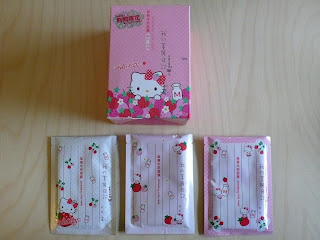
This time I acquired the chocolate truffle masks, Earl Grey and macaroon masks, and the limited edition Hello Kitty strawberry milk masks. I am actually very excited about the Hello Kitty masks!

Here is a sneak preview of the cute packaging of the Hello Kitty Mask:

Design 1 (I love this one the most!)
Design 2 (this is cute too!)

Design 3 (a big kitty on the lower left corner!)

Tuesday, May 24, 2011

Beauty Haul for Momo-chan^^


Momo-chan's love package full of yummy goodies had surely came to me as a surprise.


I have been hauling lately for her as well and I think it's time to return the favor to her :)


She has specifically asked me to get some Bobbi Brown's limited edition items when they had their 20% friends and family event a while ago. And with the deal hunter strikes again, I got her some free GWP (gift with purchase) from BB, the lip gloss and gel eyeliner :)


And of course, her favorite drugstore cosmetics (Maybelline, Almay, Revlon, and Covergirl) and a ton of OPI nail polishes (hope it will make it to Japan!)


Then it's some Crayola coloring kit for her kids too, some stickers with US characters (like Sesame Stret and Snoopy) and some dried cranberry and Peeps chocolate :)


And it's US magazines, like Vogue!


So it seems like postage will be crazy with so much heavy items! The total weight of the items in the picture is almost 10 lbs!!! But I discovered USPS actually offer a Priority International Flat Rate shipping using its own USPS boxes, the postage is a flat fee and you can stuff as much as you want into their box up to a 20 lbs limit. Pretty neat right? I will be using this flat rate service more often when sending love packages out!

Monday, May 23, 2011

Dr. Jart+ Whitening Water Drop - Ultimate Hydra Whitening Moisturizer


If any of you remember, I mentioned earlier in my blog that I got a twin pack of the Olay Regenerist micro-sculpting cream from costco 2 months ago.

Since the weather is finally warming up, I think it's time for me to move on to some moisturizer that is lighter in texture and easier to absorb. Olay's cream is a tad too thick for the day under foundation, but it's fine for night.

In my beauty package from Hong Kong, my friend Lala sent me this Dr. Jart+ Whitening Water Drop to try. (So sweet of her!)

Sephora recently started carrying Dr. Jart+, but they have only 2 products so far. But hey, they carries BB cream by Dr. Jart+, which is not bad because BB cream as so hard to come by here in this country! Only if they have more than 1 color choice though.....


This is description of the product on the box:


"makes water drops right on contact with the skin" - oh, this sounds very interesting!

And the ingredients list:


Camellia sinensis, which is tea leaves (茶花) such as green tea, white tea, black tea, and as I remembered from my old school days in plants classes, is an ingredient often used in skin care as they have excellent properties as an anti-oxidant for whitening and evening out skintone. Lately I have been experiencing some break out problems probably due to the change in weather, and I have some uneven skintone due to acne scarring. I will need hydration to quench my skin and this is such an exciting moisturizer to try before my Naruko shipment from Taiwan arrives! (Wink!!)

This moisturizer is a milky gel like lotion type that comes out of a squeeze tube (more sanitary in my opinion):


And it's quite easy to spread around:


Then after a few massages, water drops appear on the back of the hand! It does deliver what it claims on the box!


Within seconds, the moisturizer is fully absorbed into the skin. Very refreshing, and no sticky feeling. Perfect for summer months!


And did I mention that it has a pleasant slight citrus fragrance? Coincidentally, it smells like this:


My Crabtree & Evelyn Citron, Honey & Corriander hand therapy cream!

Saturday, May 21, 2011

Beautyblender - The Ultimate Make Up Sponge Applicator


One of the items I have acquired from my Sephora Friends and Family mini haul was the infamous Beautyblender makeup sponge applicator.

I used to use latex sponge wedges for my liquid foundation makeup and then move on with a foundation brush to apply foundation, thinking it's better. But no, so I return back to square one on sponge wedges. Then while blog strolling, I discovered a lot of beauty bloggers raved about this Beautyblender. At the same time, Sonia Kashuk has a similar latex sponge application with a funny "poop" like shape for $9.99 at my local Target.


Well, I maybe a little to imaginative to think it looks like a little piece of blue colored poop.

But at almost half the price of Beautyblender, it seems like a deal. Beautyblender retail for $19.95 for a single one and $25.95 for a two pack one.

I am all about beauty on budget. So my first move is to get the Sonia Kashuk sponge and try it out. The tip actually makes application around hard to reach areas, like nooks and crannies around the nose area, easier. But to my disappointment, the cleaning part is hard. No matter what kind of cleaning agent I used,  shampoo, cleansing oil, eye makeup remover, you name it, the stains from the make up didn't really go away. And no matter how many time I squeeze water off the sponge from rinsing, there is still milky water coming out... And I interpret this as there is still "something" trapped inside the sponge, aka, a lala land for bacteria!

So after countless squeezing, the tip is starting break off! And it's just the first time using and cleaning it! Ok, I just have to return it because it just doesn't work.

So Sephora's Friends and Family event came along and I decided to give Beautyblender a shot.

See how the size of the sponge increases before and after the first soak?


But a minor drawback. Pink dyes keep coming out from the sponge as I soak it for the first time. Pink residue water from the sponge:


And that's after the second soak too! It took me 5 soaks before the residue water comes out completely clear!

Now moving to the application part.

Applicator used from left to right, common sponge wedge > MAC 190SE foundation brush > Beautyblender:


I dabbed 3 tiny spots of my Bobbi Brown skin foundation SPF 15 on my arm and used the 3 applicators to spread the foundation out:


Results:


It's quite hard to see the results on my arms and in the picture actually. But the difference is more obvious  when applying to the face.

Sponge wedges: The good thing is they usually comes inexpensive and you can dispose them after each use without breaking the wallet (but not too environmentally friendly tho!!) The tip is great for applying foundation around the nose area as well. However the main problem I have is this kind of sponge soak up too much foundation even I apply it wet. Not that money saving afterall, given that foundation costs a lot more than a bag of cheap sponge wedges, right?

MAC 190SE foundation brush: Well, this is sort of a disappointment for me. Not only does the foundation seems to be sitting on my face without blending it in. And another big draw back is the horrible streak lines the brush leaves behind when applying. A definite NONONO for me!!

Beautyblender: This is my new found love. Foundation blends on smoothly and coverage is excellent. It does a great job concealing my pores and making my foundation flawless. None of issues I had with the sponge wedge or MAC 190SE foundation brush. It doesn't soak up as much foundation liquid as the sponge wedge. And cleaning is rather easy too, with the use of my cleansing oil. 

The final verdict: I love the Beautyblender. Bye bye sponge wedges, bye bye MAC 190SE!

Friday, May 20, 2011

Gradation Nails with OPI Nail Polish


I usually put on a new color of nail polish on Fridays so I can enjoy them while going out with my love on weekends.


Last weekend was a special one because it's one of our anniversaries. (haha, we have multiples because we have different a wedding date and reception date!) Last year this time, we were in Hong Kong hosting our reception banquet :)


Lately I have been really into gradation nails. I know I could order Japanese nail gradation liquid online but they do not come cheap. So I just figure I can DIY my own gradation nails using different nail polishes. Since we often have good deals with OPI nail polishes from Ulta, why not make use of this?


This time I used 3 colors,  I Juggle... Men, Last Friday Night, and Happy Anniversary (haha, this is just coincident!)


I Juggle... Men is from OPI's Femme de Cirque collection while Last Friday Night is from OPI's Katy Perry collection. They maybe hard to find in stores now.

After applying a nail base, I coat a thin layer of Happy Anniversary, which is a silvery pearl color to the entire nails. Then I go back to apply a second layer towards the tip of my nails for the silver pearl color to appear more opaque. Next, I apply a thin layer of Last Friday Night on my nail and then go back to apply more nail polish at the tips to build more color intensity and glitter. Last Friday Night is quite sheer in color so it may take 3 more coats to show the color. And I also notice that the glitter collection tends to be a lot thicker than their regular nail polishes so you gotta be patient! Finally I top my nails with I Juggle... Man as a top coat.


And voila:


Nice and subtle^^

Thursday, May 19, 2011

Anniversary Date - Part 2 DInner for 2 at Food Factory Miyake


Around 2-3 years ago, as my love and I was watching Andrew Zimmerman's "Bizzare Foods" on TV, we came across this name, Food Factory Miyake.


Miyake is a small little Japanese restaurant located in downtown Portland, Maine. It is about 2 hours away from where we are located and we have been waiting to try this for a while. What's better than celebrating our anniversary there?

Last year we attempted to go there. But my silly other hand didn't look carefully on their website that they are closed on Sundays, so we gave up as we almost head towards the door that Sunday.

So we finally made a reservation there, this year!


The restaurant itself is tucked away in a corner and it's quite small, as you would imagine how small some sushi bars are in Tsukiji fish market in Tokyo. There is a sushi bar with 5 seats, and 8 other tables, and the entire restaurant may only be able to fit a handful of 40 people maybe?

We made a reservation at 6:30pm on a Saturday, and it's already jammed pack. Reservation is definitely needed!

We specifically asked for to be seated at the bar so we can see how our food was being prepared. And, we love to interact with the chef, Chef Masa!


And here's a photo of the menu:


There is not really a whole lot to figure out on the menu, but after 2 minutes we decided to go with the Omakase II (5 courses) and Omakase III (7 courses) to try a range of what Chef Masa (the owner) has to offer. Omakase (お任せ) literally means "it's up to you," a.k.a Chef's choice.

We started with this small appetizer on the house, it's tuna tartar served with chopped green onions and fresh Maine seaweed (talk about ingredients being local!!):


Just as we were trying the appetizers, I spotted this on top of the sushi counter:


That's quite creative to use the shells as a serving cup/container.

In about a few minutes, we got the same thing delivered to us for our Omakase set:


Monk Fish liver, taste like fois gras, but not as greasy:


Conch, slightly cooked, and very sweet and not chewy at all:


Maine squid, sashimi style served with chopped spring onions. Dip a little soy sauce with some wasabi on it. It's local and I am surprised how tender and non-chewy the texture is:


Moving on to the next platter, again, a very creative use of shells/tails as a garnish:


Sweet Maine lobsters, slightly cooked (it's perfect) and mix in with their special dressing, and it's so nice, tender, and sweet:


Chu-toro and swordfish sashimi. Very high quality and there is no unpleasant fishy smell. We can really taste the full fish favours:


Salmon toro, slightly torched on the underside. This is another great piece of sashimi too:


I had a little fun recreating a lobster while waiting for the next course to be served:


This is like chapachio (forgot the fish name) with arugala and sea grapes - the tiny green bubbly things that look like caviar, it's my first time trying it and it tastes like sea water (duh, they are from the sea, right?) and the texture is a bit crunchy, like the crab roe you will normally get in sushi. The little orange garnish on top of the fish is actually quite spicy:


Grilled Perch with a bed of Maine seaweed (2 kinds), I am liking the local seaweed here:


Grilled swordfish toro (belly). Normally we would expect swordfish to be rather dry, and this piece of swordfish belly is just heavenly!! It's tender, moist, and melts in the mouth!! I like it a lot! And it comes with scallion and fiddlehead garnish:


This spring fiddleheads are the main reason why we came to Miyake. In the show "Bizzare Foods" we saw these fiddleheads that are only available for a short period of time during spring of each year. Fiddleheads are actually baby ferns that sprung out during early Spring and it is only at that time ferns are editable to humans... when ferns mature, they are poisonous to humans, as it was said:


Duck 2-ways. The sliced one is a bit too "raw" and gamey for my taste and the shredded one is mixed in with some sweet plum sauce. Perhaps I am more used to Chinese style duck dishes so I am not particularly thrilled about this dish:


The finale, nigiri sushi! I forgot some of the names for the fish that we don't normally see in sushi places. I know the salmon looking fish is actually Rainbow trout, and there is also a trout from Ireland... and an exotic fish from Brazil... there is also the tuna chu-toro (yum, it just melts in your mouth!) and the ikura is amazingly fresh (trust me, I have eaten not so fresh ikura that tastes like wine)... and it's not fishy at all, now we are talking about high quality sushi here!


So that concludes our omakase courses. But we still have room for dessert, and for that night they have 3 kinds of desserts, green tea tiramisu, yuzu creme brulee, and chocolate opera cake. We opt in for the first two desserts!

Green tea tiramisu. This is certainly inspirational. Who knew that tiramisu will taste so good with green tea powder! And the tiramisu is not soggy at all! It's built on fluffy angel cake (I think):


Yuzu creme brulee. This has far exceeded my expectations. Who knew that yuzu will work soooo well with egg custard? My taste buds are having a heavily feast!


See how the caramel layer cracked open:


Both desserts were fantastic, but if I were to pick a winner out of the two, it would have to be yuzu creme brulee!

I tried to take some pictures of other works of art that the chef did, but they are really fast in serving the food. By the way, it's the Korean sushi chef that you see here in the picture:


It took us a while to convince all the chefs to take a picture with us (they are busy with the orders!) and here you see in the front (who is gazing away from the picture) is Chef Masa, the owner: